Followers

7/22/09

Summer Salads


I am very excited about the food growing in my back yard. Ever since I sowed the first seeds, I've been going out almost every morning to survey my back yard in search of new ripe veggies. I keep looking at my fennel and inspecting my carrots and zucchinis, waiting for the day I can pick something to eat. It is an inexplicable feeling but I really enjoy seeing how things take shape in my garden. I have been eating the fruits of my labor for several weeks now. I'll tell you, it is not bad for an inexperienced gardener! Things are tasting mighty good!


I made this salad with my first summer squash and tomatoes. Just thinly slice the squash and halve the tomatoes. Toss them with some avocado oil and season them with sea salt and freshly ground black pepper to taste. Sprinkle with fresh mint.


With these three ingredients I prepared another salad. Roast some beets in a 400° oven for 25 minutes. When cool, peel and slice them. Clean and slice the fennel and the tomato. Arrange all three ingredients on a plate and season with salt and ground black pepper plus a little bit of sumac. Sprinkle with extra virgin olive oil and the juice of half lemon. Garnish with fennel fronds.

Mmm, summer salads, what a treat!


7/10/09

Homemade Yogurt


I love cheese and most dairy products but I've never been a fan of milk or eating dishes prepared with milk (rice pudding, for example). Yogurt is another food I used to hate! I always associated it with my dislike for milk. My mother always had a jar with yogurt starter on the kitchen counter. She would change the milk every other day (I think; I don't remember exactly how often) and it produced a thick liquid yogurt. She used to mix it with fresh fruit in her blender and my sisters drank it as a healthy breakfast - I never liked it.

Last year, Kim, The Farmer's Marketer, posted a recipe for homemade yogurt. Kim uses a different method than my mother. My mom's recipe seemed to need more tending, which is something that turned me off. Since I have been trying to eat healthier food, I decided to incorporate yogurt into my diet and to give Kim's recipe a try.

After making yogurt for the first time, I fell in love with it! I have been making my own yogurt for several months now. I turn half a gallon of milk into yogurt every other week and store it in individual portions. I eat yogurt for breakfast every morning during the week; sometimes with dates or fresh fruit but most of the time with homemade granola (another one of Kim's recipes). I also like to make yogurt cheese to eat with bread or crackers.

If you want to make your own yogurt, you will need to buy a small container of plain commercial yogurt to start with. I only used commercial yogurt in the first batch I made. After that, I have been using the whey to make new batches; I drain some of the yogurt for two days and it produces excellent cheese and about 3/4 cup of whey. I use this to make my next batch of yogurt; it works great.


Plain Yogurt
(from Kim's recipe)

1/2 gallon organic milk, at room temperature
2-3 T. plain commercial yogurt, at room temperature
hot water (almost boiling)

You will need a candy thermometer and an insulated container like a cooler.


In a large pot with heavy bottom, warm the milk at very low heat stiring constantly to avoid scalding it (use a wooden spoon). When it reaches 185°-190°F, turn the heat off and let the milk come down to a temperature of 120°-125°F. Stir in the commercial yogurt until thoughly mixed. Pour into one or more containers and cover (I use 15 individual containers - recycled jars). Place filled containers in the cooler with a jar of hot water, cover with a kitchen towel, close the cooler and let it sit undisturbed in a warm place. If the starter was active and the temperature correct, you will have beautiful yogurt after 8 hours. (I always start my yogurt around 6:00 PM and it is ready in the morning). Cool in the refrigerator before serving.

To make cheese, add a little bit of salt to your yogurt and drain it in a fine strainer or a coffee filter over a container. Drain in the refrigerator overnight (two nights if you like thicker cheese). Save the whey for your next batch of yogurt, or use yogurt from your first batch.

7/5/09

Jamaica - Sun Tea


One of the things I am grateful for is that, while growing up, my mother seldom let us drink soda pop. We only drank soda when we attended a birthday party or on special occasions. Although I like the taste of soda pop, I don't like all that sugar in it. I'm glad my mother always prepared aguas frescas for us and she controlled the sugar that went into these drinks.

Aguas frescas are drinks made with fresh fruit, herbs and sometimes grains. The fruit flavors range from watermelon, strawberries, tamarind to guava. Pinole (ground-toasted corn) and horchata (ground rice) are some of the grains used for aguas frescas. But my favorite has always been jamaica.

Hibiscus flowers, or jamaica (Pronounced ha-MY-cah) in Spanish, make a wonderful drink called agua de jamaica. This is an herbal tea that is served all over Mexico. It has a vibrant ruby red color and a very refreshing taste. Most Mexican restaurants in San Diego offer this drink as an alternative to ice tea.

Although most people prefer this drink sweet, I like mine unsweetened and I brew mine under the sun as opposed to boiling it on the stove.
Jamaica - Sun Tea

1 cup dried Jamaica flowers
6 cups water

Add the water to a glass jar. Place the flowers in a tea strainer and immerse it in the water. Cover the jar and place in a sunny spot in your garden. After a couple of hours the tea will be ready. Discard the
flowers and store the tea in the refrigerator until cold. Serve over ice.

This is an alternative recipe for those of you that like it sweet.

Agua de Jamaica

1 cup dried Jamaica flowers
6 cups water
3/4 cup sugar

Bring the water to a boil. Stir in the jamaica flowers. Add the sugar, reduce the heat and cook for 10 more minutes. Strain the mixture, pressing the leaves so all the juice squeezes out. Discard the flowers. Taste. If it is too tart for your taste, add more water and/or sugar to correct for tartness and sweetness. Cover and refrigerate before serving.

6/26/09

My Ornamental Garden

Hot Pink  
 
Blue Flower
 Colorful Birdbath  
Purple Butterfly
Iron Sun  
Shining Through
Smiley Worm  
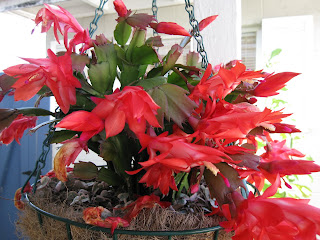
Fire in a Basket
Peeing Party  
Night Bloomer
Split Rocks  
Sunny Wall
Broken Face  
Rallito de Sol
Hummingbird Feeders  
Pure White
Flowering Barrel      
Little Turtle
Giant Grasshopper  
Desert Bloom
Little Pig  
Mint
Dragonfly  
Flying Dragon
Hummer's Favorite  
Mini Lizard and Frog
Driftwood  
Red
Bayer's Sundial  
The Blue House
Mushroom  
San Francisco
Geranium
Jarritos  
 
Succulent
Road Kill
Blue

6/19/09

Verdolagas - A Weed Worth Eating


Last year Rich and I saw verdolagas at the farmers' market for the first time and learned the English name; Purslane. Verdolagas is a very common thing to eat in Mexico where it is sold in most groceries stores but it is hard to find in San Diego stores. Luckily, it grows wild everywhere. A long time ago, before Rich became a vegetarian, I used to prepare this green leaf and red stem plant in a stew with shrimp. My mother, as most people I know, prepares it with beef backbone in a red chile sauce (verdolagas con espinazo). It is delish!

One day, while cleaning my garden, I discovered a new weed growing. I was very excited when I recognized this weed as Verdolagas. I decided to let it grow to harvest at a later day, and that day came! Since Rich doesn't eat meat anymore and I wanted the dish my mother used to make, I called my brother Cuco and his family to come and join me in my feast of verdolagas (I had a lot!). They brought the meat and I had the rest.

I didn't want Rich to miss the flavor of verdolagas that he used to like so much. We looked up a recipe from epicurious that uses uncooked verdolagas, grilled zucchini, tomatoes and parsley. This was the first time I ate uncooked verdolagas, I liked them.

If you recognize this weed and have it growing in your garden, don't just pull it, try to cook with it. I think you'll enjoy it.


Purslene with Backbone Stew

3 lb. backbone, beef or pork
1.1/2 medium onion
5 cloves of garlic
3 red dried chilies (california)
1 lb. tomatillo (about 6 medium)
4 bunches of fresh purslane, cleaned (from your garden or buy at the farmers' market)
salt and pepper to taste

In a large pot, add backbone and cover with water. Add 1 onion cut in half and 3 cloves of garlic. Add salt to taste and cook at low heat for 1-2 hours or until the meat is tender.

In a medium pot, add the red chilies, 2 cloves of garlic, tomatillo, and half of onion. Cover with water and cook for 15 minutes. When cooked, process in a blender with salt and pepper to taste. Put the sauce through a strainer to separate the solids. Reserve aside.

When the meat is cooked, add the sauce to the stew and let it come to boil for 5 more minutes. If needed, add more salt and pepper. Add purslane, turn the stove off and cover. Purslane will cook with the heat of the stew and would be ready to serve in 3 minute. Serve hot accompanied with beans and corn tortillas.


Grilled Zucchini Salad with Purslane and Tomato (from Epicurious)

1 tsp finely grated fresh lemon zest
3 Tsp fresh lemon juice
1 Tsp finely chopped shallot
1/4 tsp Dijon mustard
1/2 tsp salt
1/3 cup extra-virgin olive oil plus additional for brushing zucchini
1/4 tsp black pepper
3 Tsp chopped fresh flat-leaf parsley
4 zucchini, halved lengthwise
12 oz purslane, thick stems removed (4 cups)
10 oz pear or cherry tomatoes, halved lengthwise

Dressing:
Whisk together zest, lemon juice, shallot, mustard, and salt in a small bowl. Add oil in a slow stream, whisk until dressing is emulsified. Whisk in pepper and parsley.

Grill zucchini:
Lightly brush zucchini all over with oil. When fire is hot, grill zucchini about 4 minutes on each side or until tender. Transfer to a board and cut in 1/2-inch slices.

Toss zucchini with purslane, tomatoes and dressing in a large bowl. Serve immediately.